Overheating is a common issue with the PlayStation 5 due to dust buildup around the fan and heatsink. This detailed guide walks you through the process of disassembling your PS5, cleaning critical components, and reassembling the console—all to restore optimal cooling performance and prolong its lifespan.
Tools and Materials Required
- TR8 Torx Security Screwdriver (~$5.99)
- Phillips #1 Screwdriver (~$5.49)
- ESD-Safe Blunt Nose Tweezers (~$4.99)
- Magnetic Project Mat (~$19.95)
- Plastic Prying Tools and Spudger
- Non-static Brush, Compressed Air, or Vacuum
Note: Using the proper tools is essential to avoid damage and ensure a safe disassembly process.
Preparation
- Backup and Shutdown:
- Back up any data on your PS5 if possible.
- Gracefully shut down the console and unplug all cables.
- Workspace Setup:
- Move your PS5 to a clean, static-free working area.
- Gather all the required tools on your Magnetic Project Mat for organization.
Disassembly and Cleaning Steps
Step 1: Remove the Optical-Side Cover
- Action:
- Lift the top-left corner of the optical-side cover if the optical drive is closest.
- Clean the exposed areas with a non-static brush, compressed air, or a vacuum.
- Next:
- Flip the console over to remove the PS logo side panel.
Step 2: Remove the PS Logo-Side Cover
- Action:
- Gently pull up on the corner near the PS logo, sliding toward the vertical bottom of the PS5.
- Clean the exposed area thoroughly.
- Next:
- Flip the console back to its original orientation (optical bay side up).
Step 3: Remove the Optical Side Inlet Grill
- Action:
- Using a spudger tool, carefully pry the inlet grill from the top-left toward the bottom-right.
Step 4: Remove the Molex Connection Cover
- Action:
- Use the flat end of a plastic probe to remove the Molex connection cover.
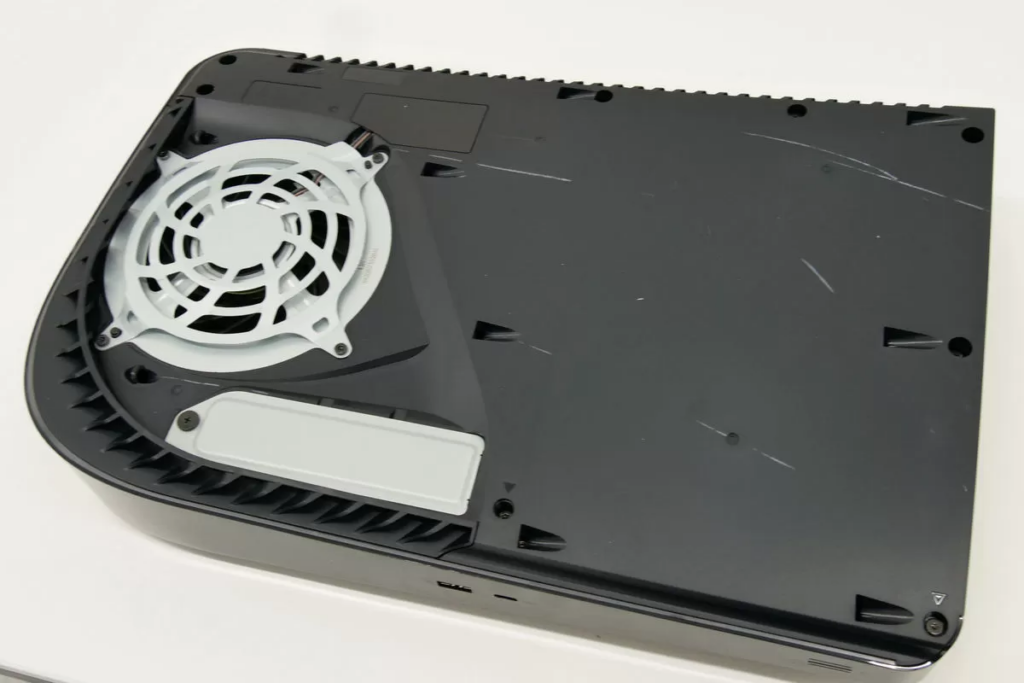
Step 5: Remove the Optical Bay-Side Fan Assembly
- Disconnecting the Fan:
- Use two spudgers to pry on either side of the fan’s Molex connector until it disconnects.
- Screw Removal:
- With the TR8 bit, remove four screws:
- Two screws with machine threads (top-right and bottom-right, approximately 23.3 mm).
- One short screw with coarse threads on the bottom-left (about 11.4 mm).
- One long screw with coarse threads on the top-left (approximately 31 mm).
- With the TR8 bit, remove four screws:
- Action:
- Remove the fan cover and then the fan assembly.
Step 6: Assess for Further Disassembly
- Action:
- Check the heatsink for heavy dust accumulation.
- If necessary, proceed with additional disassembly for a more thorough cleaning.
Step 7: Remove the M.2 Slot Cover
- Action:
- Use the Phillips #1 screwdriver (P1 bit) to remove the single screw securing the M.2 cover plate.
- Remove and set aside the cover.
Step 8: Disconnect Additional Molex Connectors
- Action:
- Disconnect the two remaining Molex connectors carefully.
Step 9: Remove the Warranty Void Sticker
- Caution:
- Removing the sticker will void your manufacturer’s warranty.
- Action:
- Remove the sticker to reveal the TR8 bit head screw underneath.
Step 10: Remove the Optical Bay-Side Inner Cover
- Action:
- With the TR8 bit, remove 11 screws (note that these vary in size; take note of each location).
- Carefully remove the cover.
Step 11: Remove the Optical Drive
- Action:
- Use a spudger tool to depress the metal clip securing the ribbon cable from the main unit to the optical drive.
- Remove the optical drive and set it aside.
Step 12: Disconnect Main Board Cable Connections
- Action:
- Remove three ribbon cables connecting various components.
- Disconnect two uFL WiFi cables (labeled RW & RB and FW & FB).
Step 13: Remove the Cover Silver Plate
- Action:
- Remove 41 Torx screws (silver) and one Torx screw (black) to remove the cover silver plate.
Step 14: Remove the Opposite Side Black Panel
- Action:
- Disconnect the attached ribbon cable.
- Flip the console over and remove two Torx screws (approximately 29.4 mm).
- Remove the panel cover.
Step 15: Remove the Power Supply
- Action:
- Carefully pull up the power supply to remove it from the console.
Reassembly
Conclusion
By following these detailed steps, you can effectively clean your PS5’s cooling system to mitigate overheating issues. Regular maintenance using this guide will help ensure your console runs efficiently and prolongs its service life. Remember, if you encounter difficulties or feel uncertain at any step, consider consulting a professional technician or referring to additional resources on
Also Read : How to Fix a Dell Laptop That Won’t Turn On