After repairing your Samsung device, whether it was a screen replacement, battery change, or internal hardware fix, it is essential to run diagnostic tests to ensure everything is functioning correctly. Samsung provides an easy way to check your device’s health using the Samsung Members app.
This guide will take you through each step of the process so you can verify your Samsung device’s performance after a repair.
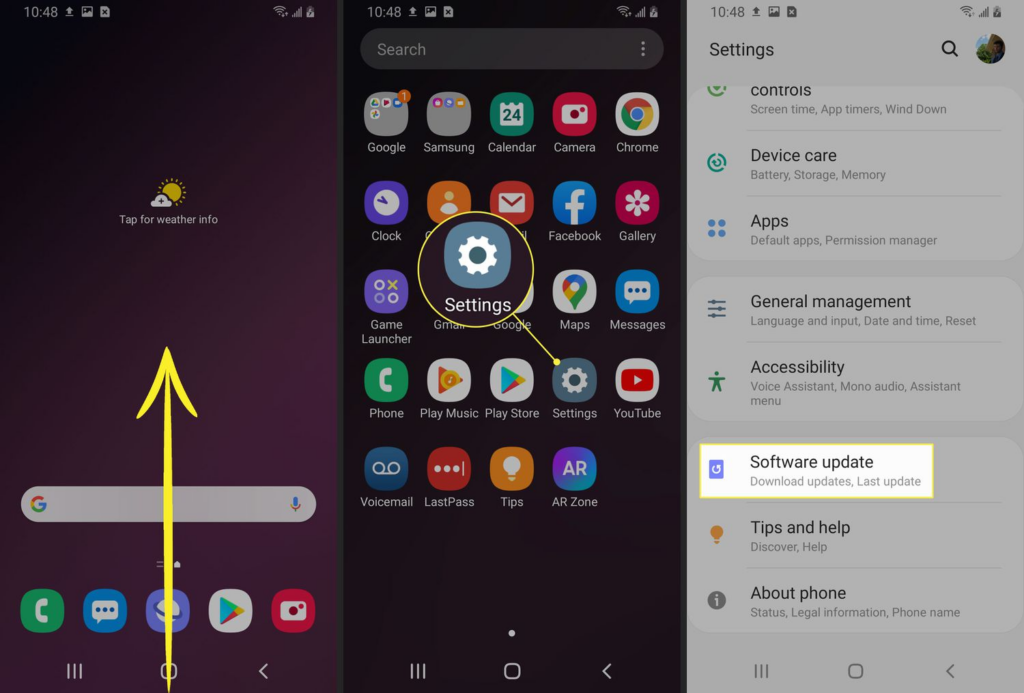
Step 1: Download the Samsung Members App
The first step in testing your Samsung device after a repair is downloading the Samsung Members app. This application provides built-in diagnostic tools that allow you to check different components of your device.You can directly download the app from the Google Play Store or the Galaxy Store.
- Open the Google Play Store on your Samsung smartphone or tablet and search for Samsung Members. Alternatively, you can access it from the Galaxy Store.
- Click on Install and wait for the app to download and set up on your device.
Step 2: Accept Terms and Conditions
Once the app is installed, follow these steps to proceed:
- Open the Samsung Members app from your home screen.
- When prompted, review the terms and conditions displayed on the screen.
- Tap “Agree to all” to check all the necessary agreement boxes.
- Press “Continue” to move to the next step.
Step 3: Access the Diagnostics Section
The Samsung Members app has a dedicated Diagnostics section where you can check the status of your device’s components.
- Open the Samsung Members app.
- Locate the “Diagnostics” tab, which is usually found near the top-right corner of the screen.
- Tap on “Diagnostics” to proceed to the test selection menu.
Step 4: Select and Perform Tests
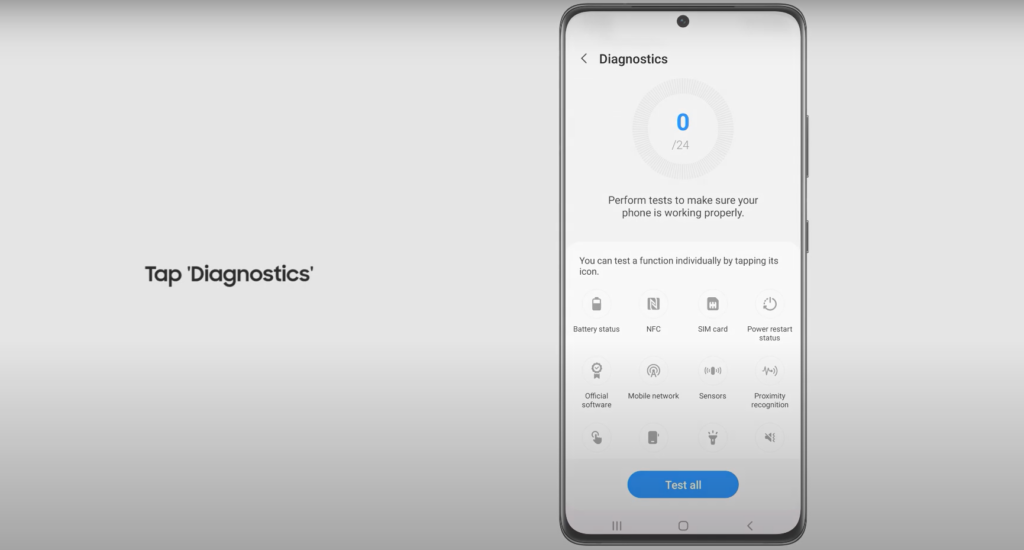
The diagnostic tools available in the Samsung Members app allow you to test multiple aspects of your device. The number of tests available depends on your Samsung model and features.
Types of Diagnostic Tests Available
Once inside the Diagnostics section, you will see various test options, including:
- Battery Status Test – Checks if your battery is functioning properly and identifies any issues related to battery life.
- Touchscreen Test – Ensures that all areas of your touchscreen respond accurately to touch inputs.
- Speaker and Microphone Test – Verifies whether the device’s speakers and microphone are working correctly.
- Camera Test – Tests the front and rear cameras to detect any issues with image clarity or focus.
- Sensors Test – Evaluates motion sensors, proximity sensors, and gyroscope functions.
- Connectivity Test – Checks Wi-Fi, Bluetooth, and cellular network connectivity.
To run a test, simply:
- Select the specific test you want to perform.
- Follow the on-screen instructions to complete the diagnostic process.
- If you want to test all available features, select “Test All”, and the app will automatically conduct a full diagnostic scan of your device.
Why Post-Repair Testing is Essential
After a repair, running diagnostic tests can help you identify potential hardware or software issues that may have been overlooked.
Benefits of Running Diagnostics on Your Samsung Device:
- Ensures that the repair was successful and all features are working correctly.
- Detects hidden issues before they cause further damage.
- Verifies that the screen, battery, and other components function as expected.
- Helps in troubleshooting connectivity problems related to Wi-Fi, Bluetooth, and mobile networks.
If your Samsung device fails any of the diagnostic tests, you may need to revisit the service center or check Samsung Support for troubleshooting assistance.
Final Thoughts
Performing a post-repair diagnostic test on your Samsung device ensures that all hardware and software components are functioning correctly. By following this step-by-step guide, you can quickly assess your device’s health and address any issues before they become major problems.
Also Read : How to Fix a Lenovo Laptop That Keeps Restarting: A Comprehensive Guide