A faulty headphone jack can be frustrating, especially if you rely on your headphones for listening to music, taking calls, or gaming. The repair process depends on whether the headphone jack is on the device (e.g., phone, laptop) or on the headphones themselves. Here’s a detailed guide to help you repair or replace a faulty headphone jack.
If the Fault is with Your Device (Smartphone, Laptop, etc.)
If the headphone jack is broken or malfunctioning on your phone or laptop, it can usually be repaired with a replacement part. Here’s how to approach it:
What You’ll Need:
- Replacement headphone jack (specific to your device model)
- Screwdrivers (small precision tools)
- Plastic prying tools (to avoid damaging your device)
- Soldering iron (if you need to reattach wires inside the device)
- Tweezers
- Isopropyl alcohol and cotton swabs (for cleaning)
If the Fault is with the Headphone Jack (Headphones)
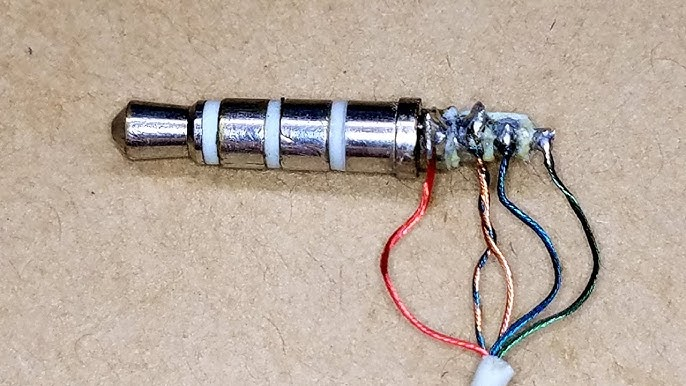
If the headphone jack itself is damaged and the issue lies within the headphones (like a frayed or broken connector), you can replace the jack directly. Here’s how to do that:
What You’ll Need:
- Replacement headphone jack (standard 3.5mm jack or compatible with your headphones)
- Soldering iron and soldering wire
- Wire cutters/strippers
- Electrical tape (if not using soldering)
- Heat shrink tubing (for additional protection, optional)
Step-by-Step Guide for Replacing a Faulty Headphone Jack
Replacing a faulty headphone jack can seem daunting, but with the right tools and approach, it’s a manageable DIY repair. Follow this guide to successfully replace a broken headphone jack.
1. Turn Off the Device
Before starting any repair, always power off your device to avoid electrical damage or potential shorts.
2. Disassemble the Device (if necessary)
Depending on the device, you may need to carefully disassemble it to access the faulty headphone jack.
- Smartphones: Remove the back cover or use a plastic prying tool to separate the phone’s body.
- Laptops: Unscrew and remove the keyboard or bottom panel to reach the headphone jack.
Refer to your device’s specific instructions, as disassembling procedures can vary.
3. Locate the Headphone Jack
Once the device is opened, locate the faulty headphone jack. Depending on the model, it could be connected via a simple port, or it may require unscrewing or unbolting. Take care not to damage any nearby components during this step.
4. Remove the Old Headphone Jack
Gently remove the old headphone jack. It may be secured with screws or simply clipped into place. In some cases, you might need to desolder the connections to the motherboard or circuit board carefully.
5. Clean the Area
Before installing the new jack, clean the surrounding area. Use isopropyl alcohol and a cotton swab to remove any dust, dirt, or debris that could interfere with the new connection.
6. Install the New Headphone Jack
Place the new headphone jack into the slot where the old one was. Ensure it is properly aligned and secured. If necessary, use tweezers to attach any wiring or connectors.
7. Soldering (if required)
Some devices require soldering the new jack into place. Use a soldering iron to attach the wires or connectors carefully. Be sure to work in a well-ventilated area, and avoid overheating the circuit board, as this could cause damage.
8. Reassemble the Device
Once the new jack is secured, reassemble the device by screwing everything back in place or reattaching the back cover or keyboard.
9. Test the Repair
Turn on your device and plug in your headphones to test the new jack. If everything works as expected, the repair is complete!
With these simple steps, you’ll be able to replace a faulty headphone jack and restore your device’s audio functionality.
When to Seek Professional Help

While DIY repairs are possible, some situations may require professional help:
- If you’re uncomfortable with soldering or working with small electronics, a technician will do a much cleaner job.
- If your device is still under warranty, opening it up or replacing parts could void the warranty. In such cases, it’s better to take it to a service center.
Final Thoughts
Fixing or replacing a headphone jack can seem intimidating, but with the right tools and steps, you can restore your device or headphones to full functionality. Whether you’re dealing with a smartphone, laptop, or broken headphones, this guide provides you with the knowledge to perform a reliable repair.
Also Read : How to Disassemble a Speaker to Repair the Charger Port