Android phone users often face a common yet preventable issue: poor charging performance due to a dirty charging port. Over time, dust, lint, and debris can collect inside the port, leading to slow charging, intermittent connections, or total charging failure.
This guide will walk you through why cleaning your phone’s charging port is essential, how to do it safely and effectively, and what tools to use—based on insights from mobile phone repair experts.
Why Cleaning the Charging Port Matters
Keeping your charging port clean isn’t just about aesthetics. It’s about performance, safety, and longevity. Here’s why:
1. Ensures Efficient Charging
Debris obstructs the connection between the charger and the phone. Even a thin layer of lint can prevent proper contact, causing slow or failed charging.
2. Prevents Internal Damage
Dust buildup can lead to corrosion or short circuits, damaging the metal contacts within the port. Once corroded, these are difficult and costly to repair.
3. Avoids Overheating
A clogged charging port can block heat dissipation, leading to excessive heating during charging. This can shorten battery life and strain internal components.
What You’ll Need
Before you start cleaning, gather the right tools. Using improper tools—especially metal—can cause damage.
- Flashlight or Magnifying Glass – to inspect the port
- Compressed Air Can – for removing loose debris
- Toothpicks or Plastic Pry Tools – for gentle scraping
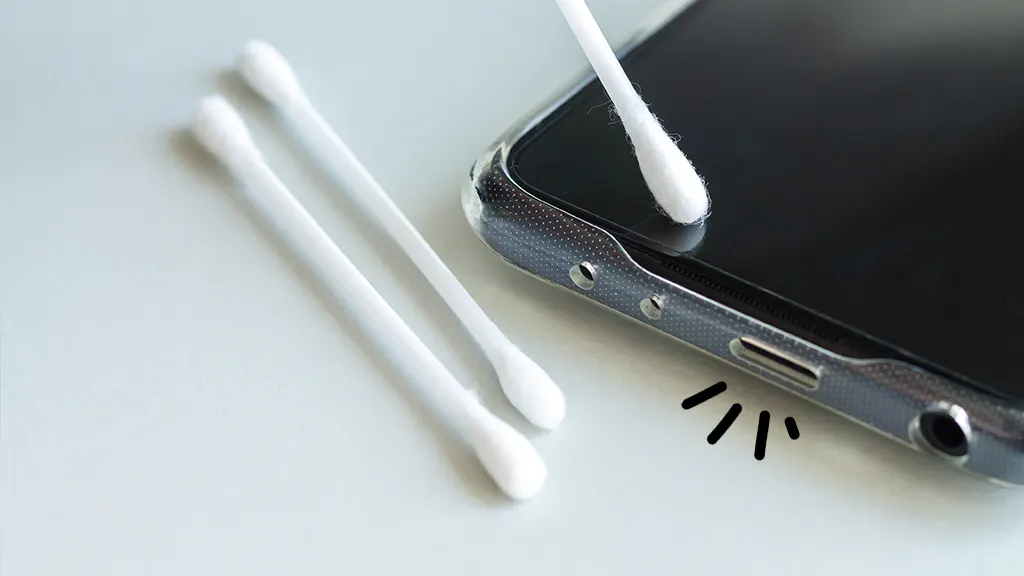
- Soft Brush or Cotton Swab – for wiping
- Isopropyl Alcohol (90% or higher) – optional, for sticky grime
Important: Avoid using metal pins, paper clips, or blowing into the port with your mouth. Moisture or metal can damage internal circuits.
Step-by-Step Cleaning Process
Step 1: Power Off the Phone
Always turn off your phone before starting. If the battery is removable, take it out. This reduces the risk of short-circuiting during cleaning.
Step 2: Use Compressed Air
Hold the can upright and gently spray air into the port for 1–2 seconds at a time, repeating 2–3 times. Avoid shaking the can or spraying liquid air.
Step 3: Gently Remove Remaining Debris
Use a toothpick or non-metallic pry tool to lightly scrape away visible lint. Be careful not to apply pressure on the port’s metal pins.
Step 4: Use Alcohol (If Needed)
If grime remains, lightly dampen a cotton swab with isopropyl alcohol (squeeze out excess liquid), and gently wipe the port’s interior walls. Let it air dry fully—this takes 5–10 minutes.
Step 5: Brush and Inspect
Use a soft brush or a dry cotton swab to clean the port one final time. Then inspect it under light to ensure it’s clear.
What If the Port Got Wet?
If your phone’s charging port came in contact with water:
- Turn off the phone immediately
- Keep the port facing downward and allow it to air dry for at least one hour
- Do not charge it during this time
- If charging still doesn’t work or you see green/white corrosion, contact a repair technician
Avoid These Common Mistakes
- Never use sharp or metal objects
- Don’t blow into the port with your mouth
- Avoid using household cleaners or disinfectants
- Don’t force anything into the port
If cleaning doesn’t restore charging functionality, the issue might be deeper—like hardware damage or loose internal contacts. In that case, seek help from a certified technician.
Final Thoughts
Regular maintenance of your Android phone’s charging port is a simple but crucial habit. Not only will it improve charging speed, but it can also extend the overall lifespan of your phone. Using the right tools—such as those from professional repair suppliers like China Phonefix—can make a big difference in ensuring safe and effective cleaning.
When in doubt, leave complex repairs to professionals. A well-maintained phone is not just cleaner—it’s smarter and longer lasting.
Also Read : How to Fix a Blurry Camera: Simple Solutions to Clear Photos